 I wanted to take advantage of the very wide angle capabilities of the pinhole and decided to make my own rather than convert an existing camera.
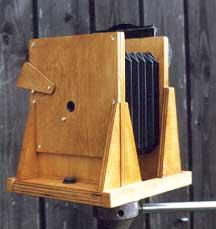
The 'design' is very simple and is made from items in my junk box, a spare 6 X 6 enlarger bellows, these can be bought from Camera Bellows here in Birmingham. The other item I'd got was an old (very) Rollex back, £5 at a fair, 8 on 120. The plywood and the brass strip came from Bob's Models and the 3/8 Whitworth nut for the tripod bush from our local ironmongers.
The baseboard is a simple 'U' shape with two uprights, one fixed for the film back one moving for the lens board. The lens board moves to two positions giving two focal lengths, 1.1/2" and 3" equivalent to 20mm and 40mm with a 35mm camera. The 'shutter' is cut from thin ply and loosely hinged on a small screw. I won't bore you with a detailed description of the construction, I think enough is apparent from the pictures.
If you do want some advice on a specific item though please email me and I'll do my best to answer.
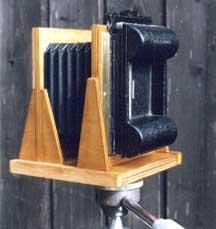 The next and most important bit is the lens board, which you will notice can be removed, sandwiched between this and the upright is the pinhole. The hole was made in a piece of rolled flat pie foil (Lamb and Asparagus from Mr Green's butcher's shop in Garratt's Green Lane, Sheldon, Birmingham) using a 0.013" (0.33mm) drill. The hole was checked against the light with an 8X loupe and smoothed gently with a very small needle. Both sides were painted matt black and the hole checked and cleared again.
How to work out the exposure came next and the search for some sort of guide, I was very lucky here for I found something really good (though I didn't know it at the time) in the Dictionary of Photography for 1951, £0.50 from the feline charity shop and one of the best buys I've ever made.
 To use the table multiply the focal length in inches by the WPF, in the case of my shortest focal length this will be, 1.1/2" X 12 = 18, call this the f stop and meter for f18. But instead of seconds or parts of seconds call it minutes, so 1/2 sec metered becomes 1/2 minute and so on. I count off the seconds, One
and Two
and Three etc this is probably a bit slow but it does take care of the reciprocity failure you've all been wondering about. Crucially, I only have to remember two numbers, 18 and 36, which makes the picture taking very easy indeed.
To use the table multiply the focal length in inches by the WPF, in the case of my shortest focal length this will be, 1.1/2" X 12 = 18, call this the f stop and meter for f18. But instead of seconds or parts of seconds call it minutes, so 1/2 sec metered becomes 1/2 minute and so on. I count off the seconds, One
and Two
and Three etc this is probably a bit slow but it does take care of the reciprocity failure you've all been wondering about. Crucially, I only have to remember two numbers, 18 and 36, which makes the picture taking very easy indeed.
 Picture trials were next and I exposed the first roll of film up at our allotments. I used Jessops cheapo 120 film both the 100 and the 200 ASA. The first film when developed had light streaks down it and I had to glue a baffle on top of the roll film back and glue some bits cut off some old corduroy trousers at the top of the brass guides. The exposure though was OK, I was delighted.
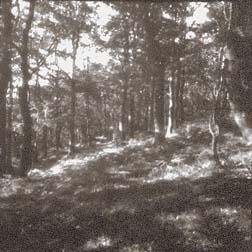
The picture on the left was taken whilst on holiday in October 1999 at the Bower near Rushok in Herefordshire using the 1.1/2" extension and HP5.
I did think that I might need a viewfinder but after a while realised that such a trifle would be a pointless extravagance.
I do hope you have enjoyed reading this and will have a go yourself, you can do it quite simply using a spare body cap. It's great fun and takes photography back to its basics. The purists say that with a pinhole there is literally nothing between the subject and the film. It works well with colour film, the results are quite beautiful.